Drawing is a timeless and fulfilling pursuit that allows individuals to tap into their creative instincts and bring imagination to life. In this extensive guide, we will embark on a detailed How to Draw a Chickens. Whether you are an experienced artist seeking to refine your poultry-drawing skills or a budding enthusiast eager to hatch a masterpiece, this step-by-step guide aims to provide comprehensive insights, ensuring you capture the essence of these charming feathered creatures with every stroke.
I. Understanding Chicken Anatomy:

Before putting pencil to paper, it’s essential to familiarize yourself with the intricate anatomy of a chicken. Observing these key features will contribute to a more accurate and lifelike representation:
- Body Shape: Chickens have a distinct oval-shaped body, which is essential to capture accurately. Pay attention to the curvature and proportions of the body.
- Wings and Tail: The wings of a chicken should be appropriately sized and positioned relative to the body. The tail consists of elongated, fan-like feathers that contribute to the chicken’s overall appearance.
- Legs and Feet: Chickens boast scaly legs and distinctive claws. Take note of the proportions of the legs in relation to the body, and observe the details of the feet.
- Head and Beak: The head of a chicken is relatively small compared to the body, featuring a beak that tapers to a point. The comb, a fleshy crest on the head, adds character and can vary in size and shape among different chicken breeds.
II. Gathering Art Supplies:
Ensuring you have the right tools at your disposal is crucial for a successful drawing session. Here’s a detailed list of art supplies to prepare:
- Paper: Choose a high-quality, acid-free paper with a smooth surface to enhance the drawing experience.
- Pencils: A range of pencils, from harder 2H for initial light sketches to softer 6B or 8B for darker lines and shading.
- Eraser: Utilize a soft eraser for fine corrections and a kneaded eraser for broader areas or creating texture.
- Sharpener: Keep your pencils sharp to achieve precision and fine details in your drawing.
- Drawing Surface: Opt for a sturdy drawing board or a hard surface that provides stability for intricate details.
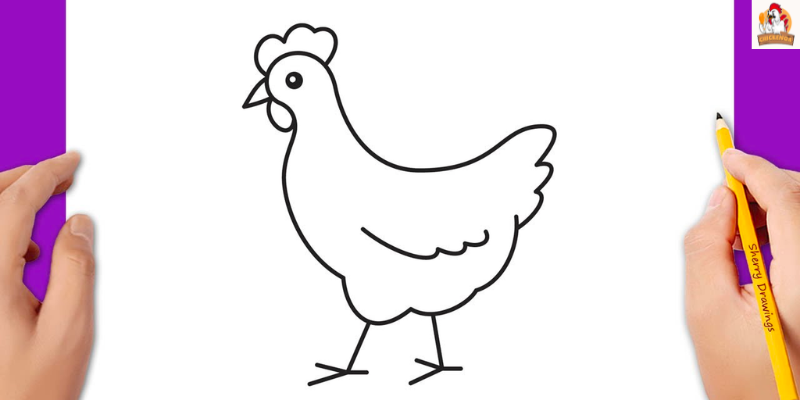
III. Sketching the Basic Shapes:
Start your drawing by sketching the foundational shapes that will serve as a guide for the chicken’s form:
- Head and Body: Begin with an oval shape for the body and attach a smaller oval for the head, ensuring it sits proportionally.
- Wings and Tail: Add elongated shapes for the wings, considering their size and placement. Extend lines to form a fan-like tail at the rear.
- Legs and Feet: Draw two lines extending from the body for the legs and add triangular shapes for the feet, keeping in mind the chicken’s stance.
- Beak and Comb: Position a small triangular shape for the beak and define the comb, adjusting its size and shape based on the chicken breed you’re drawing.
IV. Adding Details:
With the basic shapes in place, begin adding more refined details to give your chicken character and personality:
- Feathers: Outline the feather pattern using short, overlapping strokes. Observe the direction of growth, varying your strokes to create texture.
- Eyes and Facial Features: Define the chicken’s eye with a round shape and add the beak, wattle, and comb with careful attention to proportions.
- Leg Details: Refine the legs by adding scales and defining the claws. Observe the thickness of the legs and the curvature of the claws.
V. Refining and Shading:
To elevate your chicken drawing to the next level, focus on refining the details and adding shading for depth:
- Erase Guidelines: Carefully erase any remaining guidelines to clean up your sketch, ensuring that only the essential lines remain.
- Shading Techniques: Experiment with hatching and cross-hatching to create shadows and convey the three-dimensional form of the chicken. Pay attention to the play of light on different parts of the chicken’s body.
- Highlighting: Introduce highlights on areas that catch more light, such as the top of the comb, feathers, and the tip of the beak. This adds realism and dimension to your drawing.
VI. Experimenting with Style:

Drawing provides the opportunity to experiment with various styles, allowing you to showcase your unique artistic flair. Consider these approaches:
- Cartoonish Style: Simplify features, exaggerate proportions, and play with whimsical elements for a lighthearted and cartoonish portrayal of your chicken.
- Realistic Style: Dive into intricate details and realistic proportions to create a lifelike representation of a chicken. This style emphasizes attention to anatomical accuracy and nuanced shading.
VII. Advanced Techniques and Tips:

For those seeking to elevate their chicken-drawing skills further, consider these advanced techniques and tips:
- Texture and Detail: Pay close attention to feather texture and detail. Experiment with different stroke patterns to capture the unique qualities of various chicken breeds.
- Dynamic Poses: Explore dynamic poses to add movement and energy to your chicken drawings. Consider drawing chickens in different activities or postures to enhance the overall narrative.
- Background Elements: Integrate background elements to create a more immersive scene. Whether it’s a barnyard setting or a coop backdrop, contextualizing your chicken adds depth to the composition.
- Color Rendering: Transition from monochrome sketches to color rendering. Experiment with colored pencils, watercolors, or digital mediums to bring vibrant life to your chicken drawings.
Conclusion:
Drawing a chicken is a delightful and rewarding artistic endeavor that allows you to hone your observational skills and express your creativity. By following the steps outlined in this detailed guide, you are equipped with the knowledge to create a captivating chicken illustration that captures the essence of these charming birds. Remember, the joy of drawing lies not just in the final result but in the process of exploration and improvement. So, spread your artistic feathers and embark on a clucking good drawing adventure! Happy sketching!
Related Posts:
- The Ins and Outs of Boiling Frozen Chicken: Can you boil…
- How Many Chicken Thighs In A Pound? 7 Easy Steps To Prepare…
- Smokey Pearl Chicken: The Grey Marvel of the Poultry World
- Can Cats Eat Chicken Nuggets? Find The Best Answer Here
- Can You Eat Chicken During Lent? Find The Best Answer Here
- Chicken nuggets in air fryer: Delicious Meals